Setting Up a Rooftop Beehive
Setting up a beehive on a rooftop can be a rewarding venture, particularly in urban areas where ground space is limited. However, rooftop beekeeping involves unique logistical and safety challenges. This guide focuses on four key areas crucial to successful and safe rooftop hive installation: Wind Protection, Heat Management, Weight Load, and Access.
Check Local Beekeeping Laws
Before installing a hive, verify the specific zoning and permit rules for your city. We've compiled detailed guides for these major hubs:
Wind Protection
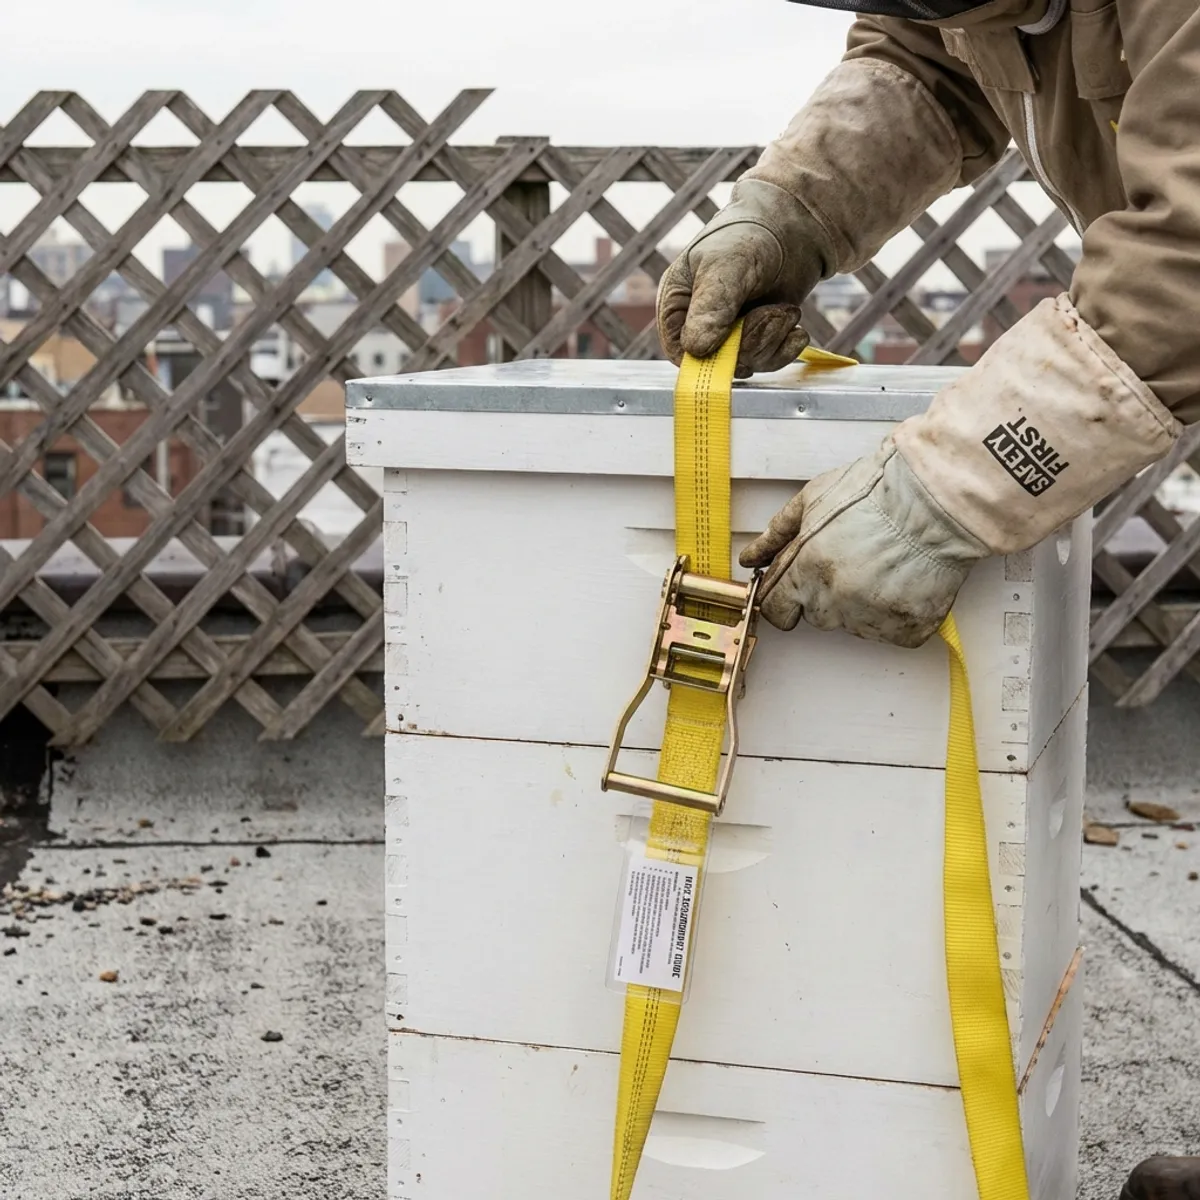
Rooftop hives are significantly more exposed to wind than ground-level hives. Sudden gusts can destabilize or topple hives, leading to damage, loss of bees, or safety hazards to people and property.
Securing Hives:
- Strapping: Use high-tension, weather-resistant ratchet straps (rated for ~1,000 lb). Secure over the top of the hive and anchor to immovable points such as railings, eye-bolts, or joists.
- Weights: Bricks, pavers, or cinder blocks can be placed atop the hive lid to add resistance. For extreme exposure, bolt hives to wooden pallets or concrete blocks.
- Stands and Platforms: Use hive stands or low platforms to keep hives elevated from the hot roof surface and to distribute wind load.
Windbreaks:
- Install a windbreak 4–6 feet upwind and at least 1 foot taller than the hive.
- Use materials such as lattice panels, fencing, or hay bales. Ensure windbreaks are securely fastened to prevent them from becoming hazards.
- Place hives behind rooftop structures (e.g., stairwells, elevator bulkheads) when possible to shield them from prevailing winds.
⚠️ Warning: An unsecured rooftop hive can become airborne in high winds. Always use multiple anchoring methods and avoid hive inspections during storms.
Heat Management
Rooftops, especially in urban settings, are subject to the urban heat island effect, where temperatures can exceed those at ground level by 5–10°F. Excessive heat inside the hive can damage brood and cause bees to abscond.
Cooling Strategies:
- Water Supply: Bees require water for evaporative cooling. Provide a shallow water source with floating materials (corks, stones, sponges) to prevent drowning. Refill regularly.
- Shade Structures: Install canopies, umbrellas, or reflective boards to reduce direct sun exposure.
- Ventilation Enhancements:
- Drill a 1-inch vent hole near the top box and cover with screen.
- Use screened bottom boards for added airflow.
- Consider a ventilated inner cover or prop open the top cover slightly.
- Surface Management: Place hives on insulation (foam board or rubber mats) to buffer from hot roof membranes. Avoid direct contact with metal.
- Hive Color and Covering: Paint hives in light colors. Cover metal tops with reflective materials to reduce heat absorption.
⚠️ Warning: Rooftop work in high temperatures is risky. Always stay hydrated, wear breathable protective gear, and work during cooler parts of the day.
Weight Load
Hives filled with bees, honey, and wooden boxes are heavy. Structural loading must be calculated to prevent overburdening the roof.
Structural Engineering Basics:
- Typical Load Capacity: Residential flat roofs are typically designed for live loads of ~20 psf (pounds per square foot).
- Hive Weight Estimates:
- A single full Langstroth hive can weigh 100–150 lbs.
- A medium super filled with honey weighs 40–50 lbs.
Load Distribution:
- Avoid concentrating all weight in one small area.
- Place hives on wide platforms (e.g., 2–3 feet across) or pressure-treated boards laid perpendicular to roof joists.
- Situate hives near structural supports like load-bearing walls or beams when possible.
Cumulative Load Considerations:
- Include the beekeeper’s weight, tools, water containers, storage boxes, and potential additional hive equipment.
- Minimize the number of people on the roof during inspections.
- Re-inspect roofing material annually for sagging or water intrusion.
⚠️ Warning: Never install rooftop hives without knowing your roof’s load capacity. Consult a structural engineer if uncertain. Overloaded roofs risk collapse or leaks.
Access
Transporting hives and supplies to the roof requires planning and safe practices.
Route Assessment:
- Evaluate building access (e.g., stairs, ladders, hatches). Ensure sufficient clearance for hive boxes and safe maneuverability.
- Secure roof access points to avoid accidental falls.
Transport Techniques:
- Break Down Loads: Always reduce weight per trip. Remove frames from supers when moving them.
- Mechanical Aids:
- Use hand trucks or dollies for heavy items.
- Install a pulley or hoist system if safe and feasible.
- Use rope and a bucket for small gear.
- Helpers: Work with a second person whenever possible during lifting or inspections.
On-Site Storage:
- Store minimal tools (smoker, veil, hive tool) in a weatherproof box.
- Anchor storage to prevent movement or blowing away.
Safety Perimeter:
- Maintain a 3–5 foot buffer from any roof edge.
- Remove debris and trip hazards.
- Keep hatchways and ladders closed or guarded when not in use.
⚠️ Warning: Never attempt to move full hive boxes up or down a ladder by yourself. Use multiple trips or lifting aids. Always notify someone before accessing rooftop hives.